Address
Caochang Industrial Area, Liguang Rd, Lishui, Nanhai, Foshan, Guangdong, China
Phone:
0086-20-8938 9313
0086-757-8938 9313
Email:
Work Hours
Monday to Friday: 8AM - 10PM
24x7 online service

Address
Caochang Industrial Area, Liguang Rd, Lishui, Nanhai, Foshan, Guangdong, China
Phone:
0086-20-8938 9313
0086-757-8938 9313
Email:
Work Hours
Monday to Friday: 8AM - 10PM
24x7 online service
Custom LED Light Box & SEG Display Manufacturer
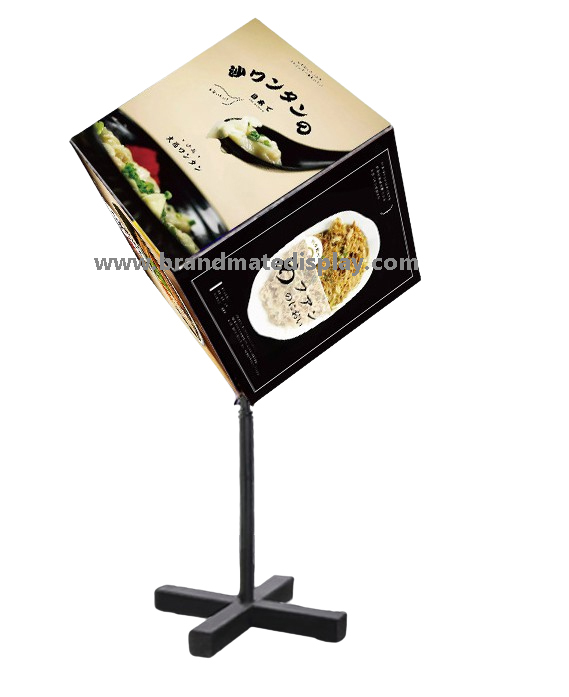
A rotating printed cube can carry different campaign messages around an assembly. To make those messages useful, approve which artwork belongs on each physical face, how it is oriented and what a visitor can read as the unit moves. A labeled face map and a recorded demonstration give the buyer, printer and installation team a shared reference before the order is released.
Quick answer: identify the printable faces on the actual quoted model, assign each an approved artwork file and revision, then review the installed sequence from the intended viewing positions. Record any wrong face, unreadable text, crop or orientation issue, correct it and repeat the affected check. Confirm the assembled model and operating behavior separately; a product photograph does not establish its face capacity, rotation controls or speed.
Ask for the exact frame or panel arrangement, printable surfaces, graphic attachment and movement behavior in the proposed configuration. A rotating light box presents physical printed graphics. If your campaign needs video or electronic scheduling, state that requirement before choosing the product system. Printed artwork approval and digital content approval need different records.
Use a drawing or labeled assembly photograph to identify the real printable areas. Give each face an identifier that the buyer and supplier both use. Request the visible area and production template for that particular face, including its orientation and any border or attachment allowance. A rigid panel and a fabric graphic have different fitting requirements; confirm the actual construction rather than applying a generic print size to every display.
Build the artwork register before printing. Its purpose is to answer a practical question at every step: which approved file belongs on this physical face? Agree a reference viewpoint on the assembly drawing so that top, bottom and face position are unambiguous. The face identifier is a project label, not a claim about how many faces a product can support.
Before releasing a print file, check for missing fonts, changed or missing linked images, text that runs outside its text box and image resolution at the finished print size. Use the agreed template for the visible area, trim and bleed; obtain the print team’s required export settings rather than resizing a screen mockup. Open the exported file as well as the design file and compare its complete text, graphics and orientation with the approved proof.
| Register item | What to enter | Evidence to keep |
|---|---|---|
| Physical face ID | The agreed identifier and position on the actual assembly. | Marked drawing or photograph using the same reference viewpoint. |
| Artwork file and revision | File name, campaign, language or market, and approved version. | Released artwork file and the corresponding approval decision. |
| Template and orientation | Face-specific visible area, production template, top direction and installation orientation. | Template revision and proof showing the intended crop. |
| Message role | The principal message and the information that must be readable when this face is visible. | Buyer-approved proof with important text identified. |
| Graphic construction | Selected print substrate, attachment or finishing method, and replacement reference. | Quoted construction and a fitted sample using that specification. |
| Observed presentation | Where the face appears during the demonstrated operation and what viewers can read. | Cycle recording, observation position, issue log and approval result. |
Check the register against the print proof and again against the fitted assembly. Similar artwork can be confused even when each file is correct. Keep a face ID on the packaging or an agreed non-visible label, and define where labels may be placed so they do not mark the print or interfere with fitting. If artwork or a template changes, update the register and identify which old file is withdrawn.
The labels below illustrate an approval record; they are not product model numbers, a stated face capacity or a completed customer result. Suppose FACE-A is assigned the main offer, but the fitted sample uses the earlier artwork R02 after the buyer has approved R03. A photograph that simply looks attractive is not enough to close that mismatch.
| Record item | Example entry | Approval action |
|---|---|---|
| Face and viewpoint | FACE-A, marked on the drawing with its top edge and the visitor approach. | Use the same face label on the proof, fitted photograph and print pack. |
| Released artwork | offer-R03.pdf, using accepted template T02. | Compare the finished visible area and essential offer text with this exact file. |
| Observed mismatch | Sample S01 has the older offer R02 on FACE-A. | Withdraw R02 from the active print set, fit the approved revision and retain the original issue record. |
| Reading check | The observer must identify the offer and its next action from the agreed position. | Repeat the complete presentation with R03 fitted; record any detail that still needs artwork or presentation adjustment. |
| Final release | FACE-A, R03, T02 and the corrected sample observation are linked. | Record who approved this face and which other faces still await their own review. |
Start with what the visitor must understand: a short promotion, a product image, a directional message or a price that needs careful reading. Keep the essential information understandable when its face is visible. A visitor may approach midway through the presentation, so a sentence that depends on seeing an earlier face can be difficult to follow. Check the real campaign rather than approving a decorative image that has no important text.
At the intended viewing distance, ask an observer to read the main message and any necessary detail during the demonstrated movement. Record which part they could not finish. If a message needs more time, simplify the artwork or ask whether the proposed model has an appropriate confirmed operating option. A continuously required price list or detailed instruction may need a separate static display. Choose that arrangement from the reading requirement instead of assuming that more artwork makes every message clearer.
Review crop and orientation on every fitted face. Keep logos, important text and codes inside the template’s agreed visible area. Where a QR code is part of the campaign, check its actual destination and try it from the intended viewing position during the relevant presentation. If it cannot be used comfortably, revise its placement or provide an accessible static reference. Retain the result with the artwork version.
Keep the code’s required clear margin free of text or borders and maintain useful contrast between its light and dark areas. Check the finished printed, illuminated face, not just the code on a computer screen. Record the device, viewing position and lighting used for a functional scan check. Formal barcode verification, when required by the project, is a separate documented assessment.
Use the quoted model, approved support, intended graphics and supplied power configuration for the demonstration. Ask responsible personnel to operate it according to the model instructions. The artwork team can observe from the agreed safe positions without touching moving parts or opening electrical assemblies. Mounting and service decisions should follow the rotating-sign mounting guide and the actual installation review.
If the model offers movement controls that matter to the campaign, request their available settings and instructions in writing and demonstrate the proposed setting. Do not infer reverse operation, independent layer movement, stopping positions or speed adjustment from a photo. Keep any required restart behavior or operating check in the model’s separate acceptance plan; see the light box sample approval guide for the wider configuration checks.
Separate a file or orientation issue from a graphic-fit or operating issue. This keeps the correction precise and prevents the print team from changing a template to compensate for an unrelated assembly problem. Keep the original observation, not just the revised artwork, so the buyer can confirm that the intended issue was closed.
| Observed issue | Check next | Close the issue with |
|---|---|---|
| Correct files appear on the wrong faces | Compare physical IDs, packaging labels and the fitted arrangement with the approved register. | A corrected face map or fitted assembly and a labeled cycle recording. |
| Artwork is inverted or a logo is cropped | Compare the top reference, face-specific template and visible area with the proof. | A revised proof and fitted photograph for the affected face, with its final file revision. |
| The observer cannot finish essential text | Check reading distance, actual visible presentation and the amount of detail in that message. | Simplified artwork or an agreed display arrangement, reviewed again from the same position. |
| Print fit or a border hides content | Check the selected substrate, attachment, finished dimensions and fitting instructions against that face’s template. | A corrected fitted print and confirmed template; retain any changed construction reference. |
| A code leads to the wrong campaign or is difficult to use | Check the actual destination, file revision, visible location and normal viewing conditions. | A corrected destination or artwork and a recorded check from the intended user position. |
| The presentation changes after a component or operating-setting change | Identify the changed part or setting and its compatibility with the approved assembly. | A documented deviation decision and repeated checks for the affected sequence and reading task. |
Before a repeat campaign, confirm the graphics-removal method, replacement template and the working access needed for the actual assembly. Have the intended team demonstrate the instructed changeover with power isolation where the model requires it. Record tools, handling requirements and any step that needs a technician. Staff print changes are separate from electrical or drive-system servicing.
For receiving and installation, align each graphic pack with the assembly ID, face IDs, campaign and artwork revision. Separate prints from hardware that can scratch or mark them, and use the material’s instructed cleaning and storage method. Confirm the pack list before fitting. If a face or component is missing, record it and resolve the kit rather than borrowing an unconfirmed part from a different revision.
Freeze the approved face map, files, templates and sample record together. Ask for written confirmation of actual customization, sample scope, quantity, MOQ, production milestones, packing, spare graphics and commercial terms for your order. Artwork revisions can change the approval plan; agree the revised milestones instead of assuming that a previous quotation or schedule still covers the new files.
Ask for the printable-face drawing and a demonstration of the actual quoted assembly. Record physical faces and their presentation separately. A family name, product photo or description of layers does not establish a supported graphic count for every configuration.
Choose the artwork from the reading task and viewing directions. Repeating an essential message may be useful, while different campaign images may suit another brief. Record the decision in the face map and review the actual fitted presentation before approval.
A labeled video helps approve observed face order, orientation and legibility under its recorded conditions. Dimensions, materials, electrical suitability, support, service access and any required measured performance need their own inspection or documents. Keep the artwork decision within the complete sample-approval record.
Send the intended site, proposed assembly size, artwork files, message priorities, viewing directions, quantity and destination. If you already have a display, include its model reference, face labels and template. Ask BrandMate Display to confirm the quoted construction and provide the face/template information needed to prepare and approve the campaign. The rotating LED signage product page is a starting point for that model discussion.
For choosing the overall site format, use the retail signage pilot guide. For this artwork brief, email [email protected] or contact BrandMate Display on WhatsApp: +86 13516610926. A short inquiry is enough to start; the detailed files and face map can follow.