Address
Caochang Industrial Area, Liguang Rd, Lishui, Nanhai, Foshan, Guangdong, China
Phone:
0086-20-8938 9313
0086-757-8938 9313
Email:
Work Hours
Monday to Friday: 8AM - 10PM
24x7 online service

Address
Caochang Industrial Area, Liguang Rd, Lishui, Nanhai, Foshan, Guangdong, China
Phone:
0086-20-8938 9313
0086-757-8938 9313
Email:
Work Hours
Monday to Friday: 8AM - 10PM
24x7 online service
Custom LED Light Box & SEG Display Manufacturer
Plan a reusable backwall kit around the configurations you actually need. Before approving an extension, connect each layout to its frame parts, joints, supports and graphic-template revision, then check the proposed changeover on the offered system.
This guide helps exhibition contractors, distributors and rental-fleet buyers assess whether one identified system can serve several planned booth arrangements. Ask BrandMate which connections and extensions can be offered for your project. Keep each proposed combination tied to its drawing and compatibility confirmation; a modular label or similar-looking frame is not a parts-compatibility record.
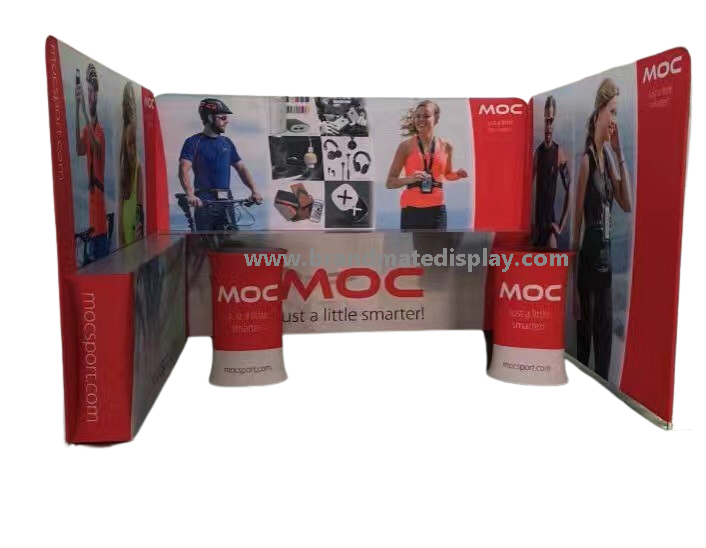
Use this view from the BrandMate Exhibition Display family to discuss the arrangement and appearance you need. The photograph shows the backwalls and counters; confirm the actual joints, reusable components and expansion limits from the offered configuration’s drawings.
Start with the arrangements your event program actually requires: the initial backwall, a later extension and any proposed corner or return. Give each layout its own reference and drawing revision. List the complete required parts for each one, including end pieces, supports and graphic attachments, rather than describing an extension only as an extra panel.
Ask BrandMate to mark which parts can be retained, which move to a different position, which additional parts are needed and which remain unused in each arrangement. A component count alone cannot show whether the available beam lengths, joint positions and end conditions form the proposed layout. Retain the annotated schedule with the quotation so the expansion scope can be priced and checked.
| Arrangement to document | Reuse to confirm | Added or changed items to identify | Graphic and release record |
|---|---|---|---|
| Initial backwall | Baseline parts, their positions and the complete support arrangement. | All required joints, end pieces, fasteners and attachments in the initial kit. | Layout drawing, component schedule, graphic pack and approval revision. |
| Extension for a later event | Which existing sections, joints and supports remain approved in the longer arrangement. | Additional sections and any replacement joints, ends or supports specified for that layout. | Revised parts schedule and the matching graphic-template and print-file references. |
| Corner or return | Which existing parts can be repositioned and the permitted orientation of the connection. | Identified corner pieces, handed parts and the support arrangement shown on the drawing. | Corner detail, panel divisions, graphic orientation and the agreed fitted-sample check. |
| Return to the initial layout | That the retained kit still contains every part required by the approved baseline. | Parts removed from use, replacements and expansion items packed separately where agreed. | Baseline drawing and graphic pack, return inventory and any open correction. |
Use an approved booth plan as an input to this schedule. For the distinction between installed size and artwork area, use the backdrop dimensions and safe-area guide. If the choice is still curved versus straight, resolve it with the backwall shape-comparison guide. This page addresses the next decision: which identified components and graphics can form each accepted configuration.
Request a joint detail that identifies the connector, adjoining frame parts, locking components and assembly orientation. Ask for the component codes and revisions used in that detail. For a system built from profiles, the mating section and receiving interface need to match the documented connection; for another construction, request its equivalent identified joint information. A front photograph cannot establish these interfaces.
Have the responsible technical reviewer confirm the proposed connection and support arrangement for each layout. A part that can be inserted is not, by itself, approval of the completed structure. Include the specified feet, braces, ends and any fixing conditions in the same review. If a corner changes the arrangement, obtain its actual detail instead of transferring the straight-wall support list unchanged.
Label left/right or inside/outside parts where the offered design distinguishes them, and show their orientation in the assembly drawing. If shelves, screens, lights or other accessories are requested, ask which configuration and interfaces can support those requirements. Record their effect on the parts and support schedule; electrical connections and site fixing decisions belong with the appropriately qualified installer.
When an existing part has no readable identifier, send clear photos and available order or drawing references to BrandMate for identification. Keep the proposed replacement separate from the approved kit until its compatibility and required checks are resolved. Avoid modifying a joint, substituting a support or forcing parts together to make a trial proceed.
Give every graphic a position on the approved arrangement. Retain its frame reference, template revision, artwork revision and top direction, together with the panel divisions or return details required by the offered system. Confirm whether the configuration uses separate prints, a continuous graphic or another attachment method; the word modular does not specify how the print is fitted.
When a section moves into a corner or an extension is added, review the graphic pack against the changed drawing. Check where artwork ends, where a seam falls and which content turns onto a return. A frame section may remain reusable while the required print size, orientation or panel division changes. Ask which existing graphics remain compatible rather than assuming the whole original set transfers.
Approve the relevant graphic fitted to the identified joint or corner. Inspect the agreed visible area, seam position, alignment and attachment according to the system’s instructions. If the fitted result shows joint misalignment, an obscured required mark or a graphic that cannot be fitted as instructed, retain photographs and the template reference, then ask BrandMate to review the hardware/template combination before approving a new print. Stretching, trimming or altering an incompatible graphic is not a substitute for that review.
Keep each accepted graphic pack linked to the layouts where it can be used. A change to a connector, corner detail or attachment should trigger a review of the affected templates and fitted proofs. Release the new print revision only after those affected checks are resolved.
Agree the representative assembly and changeover checks before ordering the kit or expansion parts. Confirm sample availability, the configurations included, the crew and tools, the instructions to use and the evidence needed for approval. The following method is a proposed buyer acceptance check, not a report of a BrandMate test or a universal setup-time claim.
| Observed mismatch | References to compare | Correction and closure to agree |
|---|---|---|
| Joint will not engage as instructed | Adjoining part codes, connector revision, orientation and assembly instructions. | Request identification or a corrected component/instruction; retain evidence of the accepted reassembly. |
| Corner or return faces the wrong direction | Layout reference, handed-part labels and corner detail. | Correct the identified part or layout assignment and recheck the intended arrangement and supports. |
| Graphic seam or alignment differs from the approved proof | Frame, corner, template and artwork revisions; fitting instructions. | Resolve the mismatched reference or fit issue, then retain the approved fitted result for that configuration. |
| Baseline cannot be rebuilt from the returned kit | Layout-specific quantities, case inventory and records of parts left at the event or replaced. | Reconcile missing or substituted parts and verify the complete baseline kit before its next release. |
Keep structural, loading and any electrical assessment within the model’s documented requirements and the responsible reviewer’s scope. A representative changeover confirms only the checks actually agreed and recorded; it does not establish an untested load rating or approval for every possible layout.
Retain one compatibility register with the kit: layout references, frame and connector codes, revisions, approved pairings, required supports and matching graphic packs. Add the quotation or order reference, approval date, responsible reviewer and open items. Use this register when requesting spares or adding another event arrangement.
If a replacement uses a newer code or revision, ask what it replaces and which existing components it is confirmed to work with. Obtain a drawing or written scope identifying affected connections, supports and graphic templates. A newer part may require another component or a revised instruction; establish that scope before mixing it into an older kit.
For example, if a proposed corner connector has a revised identifier, compare it with the retained joint detail and ask whether the adjoining frame parts and graphic return remain applicable. Where a fit or configuration check is required, keep the expansion open until the reviewed replacement and affected recheck are accepted. Retain the earlier record so the next buyer or event crew can see which combination was actually approved.
Confirm spare-part availability, order quantity, pricing and lead time for the identified revision in the actual quotation. Include the planned reorder horizon as a project requirement. An approval today is not a promise that an unchanged component will remain available indefinitely.
Use the agreed packing diagram to connect each case or bundle to its component schedule. Show the common kit, any configuration-specific additions and the graphic packs, where that separation is appropriate to the supplied packing. Include labeled illustrations of small joints and locking parts so the receiving crew can check identity as well as quantity.
Confirm case count, external dimensions, longest packed component and gross weight for the actual kit. Ask how joints, finishes and graphic attachments will be protected under the planned handling route. Follow the selected graphic’s care and storage instructions; a universal folding or rolling rule is not suitable evidence for an unidentified print material.
After an event, reconcile the returned parts against the layout that was shipped. Record damage, missing pieces and any replacement that was introduced. Keep unconfirmed or damaged components identified separately and request a condition or replacement decision before returning them to an approved kit. Update the case inventory and compatibility register when an accepted correction changes the contents.
The BrandMate Warehouse & Logistics page provides context for project identification and trade-show packing. Agree the particular case layout, labels and protective materials for your order. For the wider frame, assembly and repeat-use brief, see the trade show display buyer guide.
Share the existing frame and joint references, available drawings, current kit inventory and intended future layouts. Identify the corners or extensions needed, proposed graphic changes, accessories, venue conditions and packing limits. Add quantity, destination and required event date. Ask BrandMate to confirm the configurations that can be offered, the reusable and additional parts, and the drawing, sample and replacement scope available with the quotation.
Keep the purchasing and approval responsibilities clear: the configuration reviewer confirms the identified parts and support arrangement, the artwork owner accepts the matching graphic packs, and the event operations team checks assembly and packing needs. Record the named release authority and unresolved items with the accepted revision.
Request confirmation for the exact old and proposed part references, their orientation and the intended layout. Retain the compatible pairing and any required recheck in the kit record. Matching appearance or a shared nominal size is insufficient to approve the substitution.
Map each print to the frame, attachment method and template revision of each planned arrangement. Confirm the compatible layouts in the graphic register; an extension or corner can require a different panel division or return even when some frame parts are reused.
Agree the actual configurations and interfaces on which the purchase depends, including the required changeover and any return to the baseline. Review a later arrangement before use when it introduces an unapproved connection, support or graphic combination.
Tell BrandMate about the display and where it will be used. Share drawings and detailed specifications during the project discussion.