Address
Caochang Industrial Area, Liguang Rd, Lishui, Nanhai, Foshan, Guangdong, China
Phone:
0086-20-8938 9313
0086-757-8938 9313
Email:
Work Hours
Monday to Friday: 8AM - 10PM
24x7 online service

Address
Caochang Industrial Area, Liguang Rd, Lishui, Nanhai, Foshan, Guangdong, China
Phone:
0086-20-8938 9313
0086-757-8938 9313
Email:
Work Hours
Monday to Friday: 8AM - 10PM
24x7 online service
Custom LED Light Box & SEG Display Manufacturer
Choose the backwall that fits your approved booth layout and presents the required message from the planned aisle views. Compare curved and straight configurations using their actual drawings, fitted graphics and packing details.
This guide helps exhibition buyers and booth designers choose a shape for a particular event space. Here, waveline refers to a curved backwall profile; confirm the exact outline in the proposed drawing. Shape alone does not establish frame construction, graphic attachment, stability, lighting or expansion compatibility.
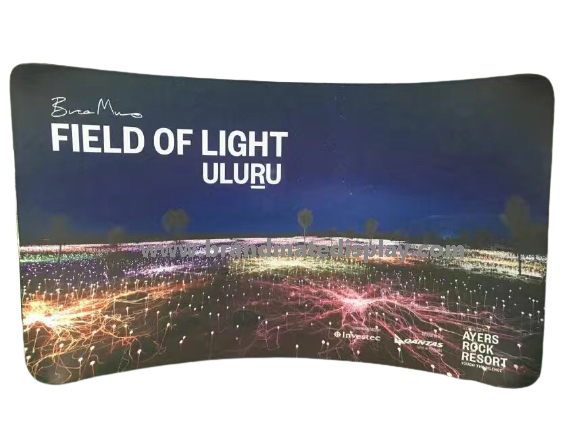
The photograph shows a curved printed backwall from the BrandMate Waveline display family. Use it to discuss the intended appearance; request the drawing and graphic template for the exact configuration being quoted.
A curved wall is a candidate when its complete installed footprint fits and its message is visible from the required approaches. A straight wall is a candidate for a linear layout or planned adjoining displays, provided its actual feet and connections fit the plan. Neither shape is automatically more compact, easier to assemble or less expensive.
Give both options the same allocated booth boundary, permitted display height, essential messages and planned furniture. If two proposed products have different dimensions, show those differences explicitly rather than treating their nominal width as equivalent. Shortlist configurations that pass the layout and visibility checks before comparing commercial terms.
| Buyer requirement | Compare on both configurations | Evidence to retain | Action when it fails |
|---|---|---|---|
| Fit within the booth | Complete end-to-end width, maximum front-to-back depth and every foot, brace or accessory projection. | Configuration-specific plan views overlaid on the same approved booth boundary and furniture layout. | Reposition or resize the configuration, or choose the other feasible layout; obtain a revised drawing. |
| Present the key message | Required words, marks or images from the main aisle, side approaches and any planned camera position. | Labeled views of each fitted graphic from the agreed positions, using the same message priorities. | Simplify or move the artwork, change orientation or reconsider shape, then repeat the affected views. |
| Replace graphics later | Exact frame, attachment method and template revision; which print components a replacement order includes. | Frame reference, template and a written replacement-print scope. | Resolve compatibility before approving a repeat-use purchase; do not transfer a print merely because widths match. |
| Handle and assemble the kit | Actual case dimensions, longest packed component, gross weight, required tools and agreed crew method. | Packing list, assembly instructions and a record of any agreed representative trial. | Revise packing or the crew plan, or compare another configuration against the same handling limits. |
| Add adjacent displays | Proposed connection, angle, end supports and accessory interfaces for the offered system. | A drawing identifying the compatible parts and installed arrangement. | Use a confirmed connection or a separately supported layout; a straight outline is not proof of modular compatibility. |
Ask for a plan view of each proposed configuration with its end-to-end installed width and maximum depth. Include feet, rear supports, edge returns and any agreed accessories. Compare the projected installed span, not the curved fabric’s path length. A front photograph cannot supply these dimensions.
For a representative trial, mark the approved boundary and furniture positions on the floor and assemble the offered system according to its instructions. Compare the installed outline with the drawing and photograph any discrepancy with its location identified. Ask BrandMate to resolve the configuration or drawing before accepting it. Confirm sample availability and trial scope for your project; this method is an approval proposal, not a reported factory test.
If you first need to separate frame size, occupied footprint and visible artwork, use the backdrop dimensions and artwork safe-area guide, then bring those measurements back to this shape comparison.
Mark the main aisle viewpoint, relevant side approaches and any planned camera position on the booth layout. Agree which message must be recognizable or readable at each position. Compare both options with the same essential message, equivalent content priorities and representative lighting; a more dramatic outline does not establish better communication.
Start with a layout mockup to check composition. Then, where shape, seams or tension affect acceptance, inspect the graphic fitted to the actual selected frame. Photograph the required views with their positions labeled. Check whether the key words and marks remain visible, whether the ends turn away from an important approach, and whether counters or demonstration equipment obscure the message.
Separate viewing perspective from a fit problem. A mark on a curved surface can look narrower from an oblique angle even when the print is correctly fitted. Wrinkles, displaced seams or deformation visible in the intended main view call for a template and fitting check. Ask BrandMate to review the exact frame/template revision and fitted result before changing the print file. Do not compensate artwork for every possible viewing angle.
If a required view fails, move the key content within the approved visible area, simplify the message, change display orientation or compare another shape. Repeat the affected views and retain the revised proof and photographs. A screen mockup helps choose composition; it does not establish final fabric tension or print fit.
Ask BrandMate to identify the exact offered frame and graphic attachment method. Curved and straight describe geometry; sleeve graphics, segmented panels and other attachment systems describe construction. A shared width or similar photograph does not make prints, connectors or accessories interchangeable. If lighting or a second printed side is needed, request it as an identified configuration with its own installation and graphic requirements.
For repeat events, keep the frame reference, drawing revision and matching graphic template together. Ask what a replacement print includes and which frame changes would require a new template. Before accepting a reorder, compare the print label and template revision with the retained frame record. Resolve a mismatch before fitting rather than stretching or modifying an incompatible graphic.
Compare the actual packed kit: number of cases, external dimensions, longest packed component and gross weight. Ask which tools and assembly steps apply, then agree who will perform them within the venue’s rules. If setup effort matters to the choice, record the offered configuration, crew, tools, starting condition and completion criteria during an agreed trial. A timing from one setup is not a universal single-person or tool-free promise.
Follow the selected system’s approved packing diagram. Label frame sections and graphics by configuration and template revision, and retain a photograph of the packed kit for the return crew. Use the supplied care instructions for the actual graphic and finish. Obtain comparable quotations with the same print scope, cases, accessories, replacement-graphic scope and delivery destination; confirm price, quantity, lead time and project terms directly with BrandMate.
Use one record to connect the chosen shape with its layout, artwork and packed kit. The fields below are for your project team to complete; they do not claim that either BrandMate configuration has passed a particular trial.
| Checkpoint | Record | Decision and closure |
|---|---|---|
| Compared options | Configuration references, shape, installed size, offered construction and drawing revisions. | Identify the shortlisted option and the requirements used for both comparisons. |
| Booth fit | Approved boundary/layout revision, complete footprint, orientation and marked trial photographs if agreed. | List any projection or access conflict, the correction and the accepted revised layout. |
| Artwork views | Frame/template and artwork revisions, required messages, viewpoint labels and fitted-graphic photographs. | Record failed views, artwork or fitting corrections, and the photographs that close the check. |
| Reuse and handling | Replacement-print scope, case/packing list, tools, crew method and any assembly-trial conditions. | Resolve incompatible parts or handling limits and retain the agreed packing revision. |
| Release | Selected configuration, final drawing and print-file revisions, open items, approval date and named approvers. | Release the agreed version when its required checks are complete; identify which checks must repeat after a change. |
Let the layout owner approve booth fit, the brand or artwork owner approve the required views, and the operations team confirm handling requirements. Keep one named release authority for the final configuration. If a frame, graphic or packing revision changes, review its affected checks before accepting the revised order.
Share the booth plan and venue limits, required finished height, essential message, main aisle/camera positions, planned furniture, repeat-event needs and handling restrictions. Include any existing frame or template reference, quantity and destination. Ask BrandMate which curved and straight configurations can be quoted against those requirements, and request their drawings, graphic templates and packing details before choosing.
No shape label establishes the complete installed depth. Compare the actual plan views, including feet, braces and accessories, against the same booth boundary.
Only when compatibility is confirmed for the exact frame, attachment method and template. Retain the matching references with the replacement-print order rather than relying on a similar nominal size.
Check the required message from your planned approaches. Part of a curve may face an aisle while another part turns away; labeled fitted-graphic views provide a useful basis for choosing the configuration.
Explore the BrandMate Waveline display family for the curved appearance, then confirm the actual shape, construction and project details with BrandMate.
Tell BrandMate about the display and where it will be used. Share drawings and detailed specifications during the project discussion.