Address
Caochang Industrial Area, Liguang Rd, Lishui, Nanhai, Foshan, Guangdong, China
Phone:
0086-20-8938 9313
0086-757-8938 9313
Email:
Work Hours
Monday to Friday: 8AM - 10PM
24x7 online service

Address
Caochang Industrial Area, Liguang Rd, Lishui, Nanhai, Foshan, Guangdong, China
Phone:
0086-20-8938 9313
0086-757-8938 9313
Email:
Work Hours
Monday to Friday: 8AM - 10PM
24x7 online service
Custom LED Light Box & SEG Display Manufacturer
Choose a portable trade show counter by what happens on its top, how staff reach the storage, and how the kit travels between events. A counter used to hold a tablet and leaflets is a different purchase from a product-demonstration bench. Before comparing prices, agree the assembled footprint, usable top area, load conditions, graphic attachment and complete packed kit. Those five items make quotations comparable and help prevent a last-minute rebuild at the venue.
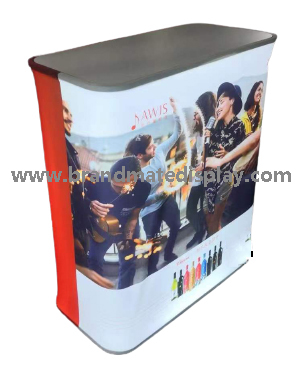
Use the BrandMate booth counter page to discuss an offered configuration. The checks below help reception teams, roadshow buyers and exhibition contractors specify the right assembly; the final drawing and quotation identify the parts, dimensions and materials for your order.
Draw the counter on the booth floor plan, including the rear opening and any door swing. Mark where visitors stop, where staff stand and how people move around the desk. A wide front can look impressive while leaving too little staff-side clearance to open storage or step away from a laptop. Check the actual venue’s aisle, access and electrical rules before freezing the layout.
List the objects that will sit on the counter: tablet, scanner, brochure stack, demonstration sample or equipment. Record their footprints and weights. Separate the outside countertop dimensions from the clear, supported working area. A curved overhang is not automatically a suitable place for a heavy sample, and a shelf rating is not a countertop rating.
For example, a reception team may value space for two forms and a tablet more than a deep internal shelf. A product demonstrator may need a defined supported area and a cable route. A roadshow team may prefer a smaller packed kit that one staff member can handle. Decide which constraint matters before selecting the structure.
Product names are inconsistent. Ask for a parts photograph and an assembly sequence instead of assuming that every “pop-up” or “portable” counter uses the same frame.
| Structure | Why a buyer might choose it | What to inspect before approval |
|---|---|---|
| Folding or expanding frame | A repeat-event kit where compact transport and a short part list matter | Fully opened frame, locking/support points, top attachment and how the graphic is removed for packing |
| Sectional or knock-down assembly | A configuration assembled from separate supports, panels and top sections | Part identifiers, connectors, tool requirements, alignment and any unsupported top joint |
| Fabric-covered display table | A graphic surface around a table or podium | The actual support beneath the cloth, usable top, finished sleeve fit and whether any storage exists |
| Case-to-counter configuration, if offered | Transport case reused as part of the event desk | The exact conversion sequence, included top/graphic parts and what happens to stored contents during use |
Do not copy a load rating, material thickness or setup time from a visually similar counter. Two units can have the same outside size but different supports and graphic systems. State whether the price includes the frame, top, shelf, printed graphic, case and spare hardware; otherwise a low unit price may simply describe a smaller kit.
Ask where the load rating applies and under what conditions: distributed across the supported top, concentrated in a specified area, or carried by an internal shelf. Record the rated limit and supporting evidence for the exact assembled model. Do not assume that a static vertical rating covers a visitor leaning on the edge, staff pulling a door, or equipment vibrating during a demonstration.
Have the supplier or responsible technician define a safe sample test within the approved limits. Assemble on the intended floor type, confirm the locks and supports, and place the actual equipment or an agreed representative load in the approved position. Record top deflection, rocking, movement at joints and whether storage remains usable. Stop the test if instability or damage appears; do not improvise an overload test at a public event.
If the unit rocks, first check that all feet and supports contact the surface and that the assembly is complete. If the top bows, review its supported span and the load position. If opening a rear panel shifts the unit, check the access arrangement with the intended contents. Each symptom needs a different correction; tightening random fasteners is not an acceptance procedure.
Obtain the template for the exact frame and attachment method before printing. Keep the template revision separate from the hardware revision. A fabric sleeve, hook-and-loop wrap, magnetic panel and rigid printed face need different finishing and replacement methods.
On a curved wrap, identify the front centerline, corners and rear seam. Keep important text away from areas hidden by overlap or sharply curved around an edge. On a sleeve, compare artwork in the fitted, tensioned state rather than only on a flat print. On sectional panels, inspect the logo across panel joins. Use the actual printed sample with the actual counter to approve alignment.
Check both the visitor view and the staff view. A neat front can conceal a rear closure that obstructs the shelf, a loose edge that catches during handling, or a print that must be removed every time storage is opened. Photograph these details while the sample is assembled.
For campaign changes, archive the print file, finished dimensions, edge/closure detail and model revision. Confirm whether a replacement graphic can be supplied without the frame. A wrap that fits one version is not necessarily compatible with a later top or support design.
Use a person who did not design the counter to follow the supplied instructions. Lay out the parts, identify the hardware and tools, assemble the frame, fit the top and shelf, install the graphic, and check stability before placing equipment. The model instructions determine the exact sequence; do not force a top or stretch a graphic to make an incomplete frame fit.
Record crew size, tools, starting condition and elapsed time. Decide whether the timing includes opening the case, locating parts, fitting graphics and clearing packing material. A demonstration with the frame already open is not comparable to setup from a closed case at the venue.
Then reverse the process and repack the complete kit. Check that the graphic and top fit without being crushed, that loose connectors are separated, and that the case closes normally. Repeat the agreed number of cycles and inspect connection wear or graphic damage. Retain the video and parts list with the booth kit so a different team can use the same reference.
| Check | Evidence to keep | If it fails |
|---|---|---|
| Floor-plan fit and staff clearance | Assembled W / H / depth; rear-access and door-swing view | Resolve the layout or configuration before approving the graphic |
| Working top and supports | Usable area, support positions and model-specific load conditions | Review load placement, supported span or a different counter model |
| Connections and stability | Completed assembly, lock engagement and observations during the safe-use check | Correct missing/loose parts or structural fit, then repeat the affected check |
| Graphic fit and alignment | Template revision; fitted front, corner, seam and rear photos | Identify whether the problem is template, finishing or fitting before reprinting |
| Shelf and storage access | Actual stored items, shelf limit and access with the graphic installed | Change the storage or closure arrangement; do not accept a front photo alone |
| Setup and repacking | Instructions, crew/tools, observed time and complete packed parts | Clarify the instructions or packing layout and repeat with the intended team |
| Top finish and graphic protection | Condition before and after repacking; separated hardware and corner protection | Remove rubbing points or pressure on the print and verify the revised packing |
| Revision and kit identity | Approved drawing, component list, artwork and case label | Resolve substitutions or missing identifiers before production release |
Mark each result Approved, Correction Required or Hold and name the recheck needed. Keep the failed measurement or photograph as well as the corrected result. For bulk orders, separately agree inspection selection, defect criteria and dispatch records. One approved pilot counter does not inspect every production unit.
Ask for outer packed dimensions and actual gross weight for each case or carton, plus the total package count. Use those records for a freight quote to the real destination and service. Carriers can charge by dimensional weight as well as actual weight; do not apply an assumed universal divisor or a shipping price copied from another route.
Include any local event handling, storage, delivery-window or return-transport charges in the comparison. A low-cost frame with a large packed top may cost more to move over several roadshows. A smaller kit is useful only if it still carries the intended load and can be repacked without damaging the graphic.
| Quote item | State clearly |
|---|---|
| Hardware kit | Frame, top, shelf where required, connectors and included spares |
| Graphic | Printed faces, attachment/finishing, template and sample approval |
| Packing | Case/carton type, protection, package count, dimensions and gross weights |
| Project costs | Sample, artwork work if any, accessories and replacement-graphic prices |
| Delivery scope | Destination, service, trade term, exclusions and the confirmed production/shipping schedule |
Tell BrandMate the intended use and event first; the exact configuration, sample costs, MOQ and production window can be confirmed during quotation. Keep the approved artwork and delivery milestone in writing. Do not release printing while the counter template is still changing.
Check the parts inventory and surface condition before the next show, not during setup. Keep fasteners in labeled bags and link each graphic to its frame revision. Separate top surfaces from metal connectors in the approved packing layout. Store graphics clean and dry; follow the actual material’s care instructions rather than assuming every printed textile can be machine washed.
For multiple teams, label each case with a kit ID and keep a photograph of the packed contents inside. Record lost or damaged components against that kit. Ask for the correct replacement part identifier instead of buying a visually similar connector that changes the fit.
Only when the exact model, supported working area and rated loading conditions suit it. Provide the equipment footprint and weight and approve the intended position; a brochure-counter description is not enough.
Confirm the attachment and finishing method and keep the template revision. Replacement graphics should be checked against the existing hardware rather than ordered from the outside frame width alone.
It describes tools, not training or setup time. Try the supplied instructions with your intended team, including unpacking, graphic fitting and repacking.
It depends on the parts and transport method. Check how the top, corners and graphic are protected and whether hardware can rub against them. Approve the complete packed kit for the intended route.
Do not assume it. Exposure, ground condition, stability and venue requirements need a separate review for the exact configuration.
The counter and exhibition display system should share an approved visual reference while retaining their own print templates. For a backdrop choice, read pop-up display versus fabric backdrop versus photocall. Use the quality-control and packing and logistics pages to discuss the records for your particular kit.
Start with a short message about the counter’s job. A floor plan or photograph is helpful if available; a detailed form is not needed to begin the discussion.