Address
Caochang Industrial Area, Liguang Rd, Lishui, Nanhai, Foshan, Guangdong, China
Phone:
0086-20-8938 9313
0086-757-8938 9313
Email:
Work Hours
Monday to Friday: 8AM - 10PM
24x7 online service

Address
Caochang Industrial Area, Liguang Rd, Lishui, Nanhai, Foshan, Guangdong, China
Phone:
0086-20-8938 9313
0086-757-8938 9313
Email:
Work Hours
Monday to Friday: 8AM - 10PM
24x7 online service
Custom LED Light Box & SEG Display Manufacturer
A custom LED ice bucket is an illuminated promotional container, not automatically an electrically refrigerated appliance. For a beverage campaign or hospitality rollout, approve the actual bottles with ice in the bucket, the logo with the light on, and the operating and cleaning routine your staff will use. Outside dimensions and a glowing product photo do not answer those questions.
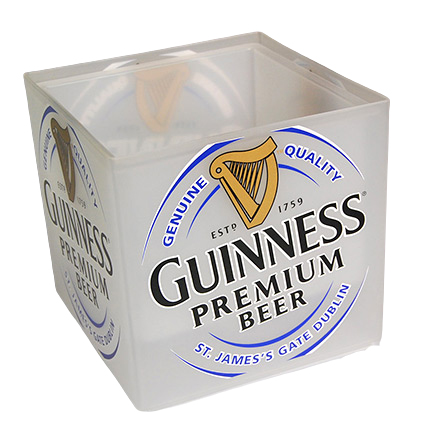
Use the BrandMate LED ice bucket page to discuss the offered shape and configuration. Power source, controls, material construction and environmental suitability must follow the model in your quotation, not the appearance of another bucket.
Give the supplier the bottle shapes and dimensions, not only a bottle count. Two bottles with similar volume can have different body diameters, shoulders and necks. Internal usable space, wall taper and any raised base affect how they sit. Leave room for the ice arrangement and for staff to remove a bottle without forcing it against the rim.
At sample approval, place the intended bottles in the actual bucket using the intended ice fill, within the model’s permitted loading and use. Photograph the arrangement from above and from the serving side. Check that staff can grip and remove each bottle, that the unit sits stably on the proposed table, and that the filled configuration can be handled as instructed. Record the bottle reference, count, fill arrangement and filled weight.
If the fit fails, identify whether the problem is the internal width, usable depth, bottle orientation or access at the rim. Changing only the outside size can leave the same internal obstruction. Ask for the internal drawing and a revised fitted sample before committing to a campaign quantity.
| Use | What matters | Sample check |
|---|---|---|
| A launch or temporary promotion | Visible logo, intended bottles and the event’s operating period | Fitted serving arrangement and lit artwork at the venue viewing position |
| Repeated bar or hotel shifts | Cleaning, charging, handling and consistent replacement parts | A complete use-to-clean-to-ready routine following the supplied instructions |
| Multi-location beverage program | Approved artwork/modes, unit identification and staff instructions | Compare pilot units and keep the final configuration and artwork revisions aligned |
| Distributor or private-label order | Retail/carton labels, supplied power accessories and destination documentation | Inspect the complete packed unit, not the bucket shell alone |
Identify the printable faces, logo dimensions, orientation and attachment or printing method in the quotation. On a tapered or curved surface, artwork can look different from the flat file. Position the important message where bottles, hands or normal viewing angles will not hide it.
Inspect the final printed sample with the light off and in the actual light mode intended for the campaign. Brightness and changing colors can alter the apparent contrast of an ink or applied graphic. Keep an approved lit reference together with the artwork and print-material revision. Do not approve print quality from a glowing photograph that hides the edges and small text.
If the brand requires a steady color, demonstrate that exact mode and check how it is selected again after shutdown. If several buckets will operate together, test whether the supplied remote affects neighboring units and how staff can identify the correct control. Confirm available controls on the offered model; a remote shown in a different product listing is not part of your kit.
First confirm the power arrangement: wired adapter, rechargeable pack, replaceable cells or another specified system. Record the supplied power accessories, connector, ratings and instructions. For a battery variant, identify the actual battery chemistry and model; do not select a charger by connector shape alone.
Define the service window and required light mode before testing. For example, the operating requirement may cover reception, the full event and the time before staff collect the units. Record the actual start and end times. A test in a low-output mode does not approve a different mode or a longer shift.
Use those observations to plan the number of ready units and charging positions. Retain results for the tested configuration and repeat the relevant check after a battery, controller or light-setting change. Do not turn one sample run into a guaranteed runtime for every unit.
Ask how the ice/meltwater area is separated from the controls, lighting and charging connection. Review the exact model’s permitted exposure and cleaning instructions. A cap over a connector, a translucent plastic body or a cold-drinks photograph is not a verified enclosure rating.
Check where condensation collects during the approved sample-use test and how staff empty and clean the bucket. Keep charging equipment and electrical openings out of wet-service handling as instructed. Do not improvise immersion, hose or powered leak tests. Where the instructions or exposure evidence are unclear, resolve the issue before approving the unit for that use.
Decide whether the ice will only cool sealed bottles or could be consumed or contact unpackaged food. For intended food contact, request documents for the actual contact surface, formulation and conditions of use in the destination market. A generic plastic name is not enough to establish suitability. Confirm which parts are removable for cleaning and how they are returned to the correct assembly.
Put the cleaning method into the staff instructions: approved product and concentration where specified, the surfaces it applies to, drying and the charging routine. Inspect the logo, shell, seals and controls after the agreed cleaning trial. Stop using damaged equipment and refer electrical or battery faults to appropriately qualified service personnel.
| Problem | Investigate | Recheck before approval |
|---|---|---|
| Bottles fit dry but not with the intended ice fill | Usable internal dimensions, taper, raised base and access at the rim | The actual bottle-and-ice arrangement, with removal and stability checks |
| The logo looks acceptable unlit but disappears when lit | Approved light mode, print coverage, color contrast and viewing position | The revised fitted print in both unlit and campaign-light conditions |
| Units do not remain useful through the service window | Starting charge, actual mode, operating period and battery/controller identity | A recorded service simulation and a workable return-to-ready routine |
| A remote changes nearby buckets unexpectedly | The actual remote/control behavior and how units are grouped | A multi-unit control test and staff instructions for the accepted operation |
| Cleaning marks the graphic or affects the controls | The permitted cleaner/method, graphic finish and electrical-area separation | An approved cleaning trial with before/after condition records |
| The shell or printed face arrives scratched | Rubbing points, nesting clearance, separators and loose accessories | The revised packing layout and agreed transport/receiving verification |
Keep the failed record, proposed correction and repeat-check result under the same sample ID. Agree the accepted configuration before production, including the shell, graphic, power parts, instructions and packing. Separately define bulk inspection and shipment-release records; the pilot is a reference, not inspection of the whole order.
List the bucket, control accessories, charger or adapter where supplied, instructions and spare parts separately. Protect printed and translucent surfaces from rubbing, and keep hard accessories from pressing into the shell. Do not assume the shape can nest safely; approve any nesting arrangement with its separators and actual clearance.
Record unit/carton count, outer packed dimensions and actual gross weights. For multiple venues, align artwork, unit and destination labels. Compare the complete delivered scope, including logo setup, sample, power accessories, packing, transport and any local handling, rather than only the shell price.
For a lithium-battery configuration, obtain the battery identity, chemistry, rated energy and applicable UN 38.3 test summary. Have the qualified shipper confirm the classification, packing and current route/carrier requirements for the exact shipping arrangement. Batteries installed in equipment, packed with equipment or shipped as spares can require different treatment; a generic battery document is not a shipping plan. Confirm documents and the route before promising an event arrival date.
| Reference | What the approved order should identify |
|---|---|
| Bucket construction | Model/revision, actual materials, inside/outside dimensions and intended use |
| Graphic | Artwork version, print size, faces, method and approved lit/unlit sample |
| Power and controls | Battery/power configuration, supplied accessories, accepted modes and instructions |
| Quality and care | Fit, appearance, operating/cleaning checks, acceptance criteria and corrections closed |
| Packing and delivery | Package contents, protection, dimensions/weights, destination and confirmed delivery scope |
No. Illumination and active refrigeration are different functions. Confirm the intended ice or cooling arrangement; specify an active refrigeration system separately if that is required.
Ask which static modes the offered model supports and approve the actual appearance. Also check how staff select that state after restart.
Those are separate questions. Review model-specific exposure/cleaning evidence and, for intended food contact, the actual contact materials and destination requirements. Neither follows automatically from the product photo.
Email the required internal capacity, outside constraints, bottle references and logo requirements. Confirm the offered construction and finished drawing before the sample; not every requested shape is an existing standard model.
Use the approved component and instructions for the exact model. Similar connector shapes or marketing capacity figures do not establish electrical compatibility.
Email [email protected] with the intended bottles, required size/capacity, logo and service situation. A short initial message is enough. The suitable configuration, sample, MOQ, costs, packing and production/shipping milestones can be discussed for your project.
For supporting checks, see quality control and packing and logistics. For a separate illuminated menu display, review the counter menu-board procurement guide; it serves a different task from holding drinks. Use the contact page or the simple form below to begin.