Address
Caochang Industrial Area, Liguang Rd, Lishui, Nanhai, Foshan, Guangdong, China
Phone:
0086-20-8938 9313
0086-757-8938 9313
Email:
Work Hours
Monday to Friday: 8AM - 10PM
24x7 online service

Address
Caochang Industrial Area, Liguang Rd, Lishui, Nanhai, Foshan, Guangdong, China
Phone:
0086-20-8938 9313
0086-757-8938 9313
Email:
Work Hours
Monday to Friday: 8AM - 10PM
24x7 online service
Custom LED Light Box & SEG Display Manufacturer
Choose a trade show table cover by fitting the proposed style to your actual table, checking the logo from visitor positions and confirming staff access. Compare fitted, stretch and draped options against those same requirements before approving a pattern.
This guide helps event teams and exhibition distributors specify printed textiles for an existing table. The table remains the supporting structure: a cover does not establish a load rating or turn it into a display counter. For a complete counter assembly, use the separate portable counter structure, graphics and packing guide.
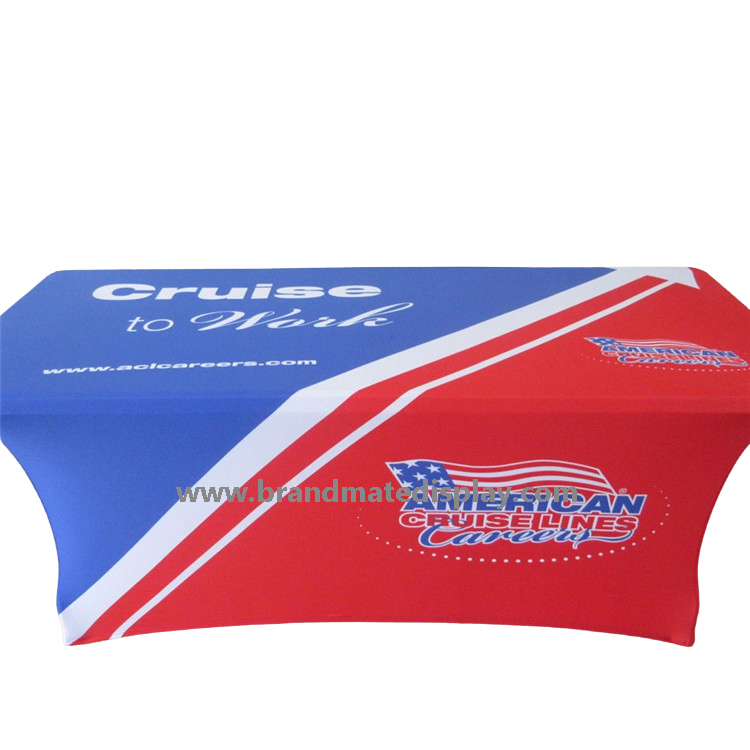
The photograph shows the fitted appearance of a printed cover from the BrandMate Table Cover family. Confirm the material, pattern, rear opening and table compatibility for the configuration being quoted; the image does not establish fabric composition or care performance.
Start with the table’s job. A staffed reception table may need rear access to brochures, while a display viewed from several aisles may need more printed sides. Mark the visitor-facing sides, staff position, required storage access and any cable route on a simple sketch. Then compare the cover styles on that same table instead of choosing from isolated studio photographs.
| Cover style | Decision it helps address | Check on the offered sample | If the check fails |
|---|---|---|---|
| Draped cloth | Coverage where a hanging hem and flexible positioning suit the event. | Center the cloth on the actual tabletop; check front and side drop, corner folds, floor clearance and logo position. | Adjust the specified cloth dimensions or artwork position and repeat the installed check; a nominal table length does not define the drop. |
| Fitted cover | A defined outline around an identified table shape. | Compare corner shape, tabletop thickness and seam positions with the table; check whether the rear opening provides the access staff need. | Correct the pattern or opening before approving printing; do not force a tight corner over incompatible geometry. |
| Stretch-style cover | A shaped appearance around the offered table and leg arrangement. | Confirm the proposed textile and attachment/leg details, then inspect the fitted print, seam strain, leg coverage and any distortion of critical marks. | Review table compatibility, fitting and pattern together; repeat the fitted proof after a change rather than approving the flat artwork alone. |
A three-sided or open-back arrangement is a project requirement to confirm, not a feature implied by the front photograph. Check how the rear edge behaves when staff reach the intended contents and stand or sit in their planned position. Keep fabric clear of the access routes required for the event. Where a cover conceals locking parts or cables, agree a setup sequence that leaves those items accessible for the responsible staff.
Erect and lock the table according to its instructions on a suitable surface before measuring it. Record tabletop length and depth, tabletop-to-floor height and top thickness, with the units stated. Photograph the tabletop shape and corners; note bevels, rounded ends, protruding fittings and any folded edge that affects how the cover sits. For a shaped or leg-fitted cover, add leg positions, angles and the attachment details requested for the proposed pattern.
Keep the measurements tied to an identifiable table model or inventory reference. Two tables with the same nominal length can have different depth, height, corner shape or leg placement. If an event fleet contains several table types, list their actual differences and ask whether one offered pattern can accommodate them. Test the proposed cover on each required geometry before treating it as interchangeable.
For a draped cloth, agree the desired finished drop on each side and how corners will hang. For a fitted or stretch-style cover, request the offered pattern and fitting instructions for that table. The supplier should confirm the finished dimensions and any allowed fit variation for the selected textile; do not calculate a universal stretch allowance from a product photograph.
Refit the sample after checking that the table is fully assembled. If a seam pulls, a hem drags or a leg pocket will not reach, stop forcing the fabric and compare the table, pattern and fitting sequence with the approved references. Photograph the location of the mismatch. Ask BrandMate to resolve the cause, then repeat the fit check with the corrected version before approving it.
Obtain the graphic template for the selected cover pattern before placing important artwork. It should identify orientation, visible front and sides, seams, hems, openings and the relevant safe areas. Keep the tabletop graphic and front-facing graphic distinct: a logo centered on a flat rectangular file may cross a fold or sit too low once installed.
Check the exported print file as well as the editable artwork. Confirm the current logo master, fonts, linked images, spelling and version. Use the print workflow and image-quality requirements agreed for the actual order rather than a universal resolution or bleed number. Retain the accepted template revision with the final export.
Fit a representative printed sample to the intended table using the supplied method. View it from the main visitor approach and any relevant side aisle, with the intended tabletop objects in place within the table’s permitted use. Check whether key words and marks remain visible, whether a seam crosses them and whether folds or tension alter their appearance. Use labeled front, corner and side photographs to record these checks; photographs help judge placement, while critical color needs its own physical approval.
If the mark appears skewed, first check centering, seam location and fitting against the correct table and pattern. A smooth print turning around a corner presents a different issue from a seam pulling diagonally through a logo. Agree whether fitting, pattern or artwork needs correction. Refit and repeat the affected views after the change, then keep the corrected file and sample reference together.
Ask BrandMate to identify the proposed textile, finish, print method and care instructions. Where composition, fabric weight or stretch behavior is important to the order, request those details for the selected option. A generic fabric name does not establish opacity, wrinkle recovery or laundering performance, and the photograph does not supply those specifications.
Inspect an agreed swatch and the fitted printed sample under representative event lighting. For a pale design, compare its appearance over the actual tabletop and against the intended under-table contents, using a safe arrangement that leaves the table setup unchanged. Record the viewing condition and the areas where the table edge or stored items show through. If the effect is unacceptable, discuss an alternative offered material, coverage or artwork and compare a new proof under the same conditions.
Look at the front corners, hems and any joins near critical graphics. Record visible seam displacement, puckering or print distortion by location. Ask for a construction or fitting review before selecting a correction; do not assume that changing to a heavier fabric will solve a pattern problem.
If repeated washing matters, agree a sample care trial using the written instructions for that exact textile and print. Record the approved method, trial conditions and what will be compared before and after: appearance, key dimensions, seams and logo placement when refitted. The number of cycles and acceptance criteria need project agreement. If shrinkage, fading or seam change affects acceptance, review the material or care plan and repeat the agreed trial rather than turning a single wash into a general durability promise.
Use the sample to connect table fit, artwork, staff access and the selected material. The record below is for your project team to complete; it is an approval method, not a report of BrandMate test results.
| Checkpoint | Evidence to retain | Correction and recheck |
|---|---|---|
| Table and pattern identity | Table reference, measured dimensions and units, leg/corner photos, pattern and sample revisions. | Resolve any geometry mismatch and refit the corrected sample on the same table. |
| Installed coverage and access | Front/side/rear photos showing hems, openings, foot space and the intended storage access. | Revise the opening or coverage; repeat both visitor-view and staff-access checks. |
| Graphic placement | Approved template and artwork revision; fitted photos from the agreed main and side views. | Separate fitting, pattern and artwork causes; retain the revised file and repeat affected views. |
| Fabric appearance | Material/finish reference, approved swatch, viewing conditions and any agreed opacity comparison. | Select a different offered material or adjust the design; approve a new representative printed proof. |
| Care and reuse | Written care method, agreed trial conditions and before/after observations for the selected sample. | Review material, finishing or care method; repeat the agreed trial and refit if dimensions or seams change. |
| Release version | Final table/pattern/material/artwork references, closed corrections, approval date and approvers. | Keep an unresolved item on hold; identify which checks repeat if any accepted reference changes. |
Have the event or operations owner approve access and handling, the artwork owner approve the fitted design, and the buyer identify the version released for the order. Record an item as accepted, correction required or on hold, with a named owner and the evidence needed to close it. Retain the failed photo or measurement as well as the corrected result so a later reorder can follow the decision.
A sample approval identifies what was accepted. Separately agree how production pieces will be identified and checked before dispatch, including artwork version, quantity and any inspection selection. One approved sample is not evidence that every finished cover has been inspected.
Label each cover or its bag with the table reference, pattern and artwork revision, intended orientation and care instructions. Keep the material/finish reference and approved fitted photographs with the reorder record. For a fleet of similar tables, allocate the cover to the matching geometry rather than relying on its color or a nominal size written on the bag.
Follow the accepted care and folding instructions, and store the cover clean and dry, separated from sharp fittings or dirty hardware. Before the next event, inspect the print, seams and hems, then refit where condition or table allocation has changed. Resolve snags or distortion before sending the cover to another team.
A different table depth, top thickness, corner profile, leg position, textile, finishing method or rear opening can affect the accepted fit. Flag the change when ordering replacements and repeat the relevant sample checks. Reusing the artwork file alone does not approve a new pattern. Confirm the exact quantity, sample scope, packing, price and delivery timing directly with BrandMate for the order.
Begin with the table’s actual dimensions and clear front/side/rear photographs, the required cover style, visitor-facing sides, rear access and logo position. Add the artwork, care needs, table variants, quantity, destination and event date. Ask BrandMate to confirm the offered material, matching pattern/template and sample route for those requirements. Detailed files can follow the initial inquiry.
Only where the offered pattern and textile are confirmed for those actual geometries and the fitted results meet your coverage and artwork requirements. Compare each required table rather than treating a nominal length as proof of compatibility.
No. Confirm the material, fitting method and care data for the quoted option. The installed appearance and the documented textile specification answer different questions.
Keep the accepted table, pattern, material and artwork references together. Ask for a compatibility review if any one has changed before accepting the replacement.
Explore the BrandMate Table Cover family, then discuss the actual table and event setup with BrandMate.
Tell BrandMate which table you use and how the cover should look and function at the event. Share measurements and artwork during the project discussion.