Address
Caochang Industrial Area, Liguang Rd, Lishui, Nanhai, Foshan, Guangdong, China
Phone:
0086-20-8938 9313
0086-757-8938 9313
Email:
Work Hours
Monday to Friday: 8AM - 10PM
24x7 online service

Address
Caochang Industrial Area, Liguang Rd, Lishui, Nanhai, Foshan, Guangdong, China
Phone:
0086-20-8938 9313
0086-757-8938 9313
Email:
Work Hours
Monday to Friday: 8AM - 10PM
24x7 online service
Custom LED Light Box & SEG Display Manufacturer
Plan a double-sided illuminated poster stand as one installed assembly: the agreed base and upright, two identified graphics, the complete power route and access for changeovers. Approve the drawing and a representative site sample together before releasing a store rollout.
This guide helps retail buyers, display distributors and shopfitters decide whether an already selected freestanding printed-poster light box fits a particular shop-floor position. The aim is useful visibility from both approaches with an agreed placement and maintenance arrangement. Two illuminated faces alone do not establish stability, an acceptable walkway or permission to use a stand outdoors.

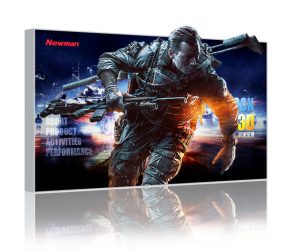
The photograph from the BrandMate LED Vertical Double-Sided Display family shows an upright curved poster face, side profile and projecting base. This view does not establish the reverse-face opening method, assembled mass, cable exit or tip resistance. Request the drawing and documents for the exact offered configuration rather than deriving those properties from its appearance.
Mark the proposed stand on a current plan, using its full base dimensions and orientation rather than the width of the poster face. Add the actual customer approaches, queues, adjacent fixtures, doors, cleaning route and power point. A slim-looking upright can still have a base that extends into a circulation path.
Separate the area occupied during normal display from the area needed to open a face, remove a graphic or reach an isolator. Check whether a trolley, door or cleaning machine enters either area during ordinary operation. If graphic changes require temporary relocation, record an approved service position and a method for moving the exact unit. Do not assume that it has wheels or can be lifted by its top trim.
Ask the property operator and relevant site reviewer to confirm placement, required clear routes and any accessibility, exit or projection restrictions for that location. Keep their agreed plan revision. This is a location approval task; no universal aisle dimension or legal clearance is established by this guide. If the proposed base or working area conflicts with a required route, revise the position or configuration and obtain another review before installation.
| Decision | Record for the proposed location | Evidence to request |
|---|---|---|
| Occupied footprint | Base outline, upright orientation, traffic approaches and nearby moving fixtures. | Dimensioned plan and elevation for the exact assembled variant; site-approved placement plan. |
| Floor and public interaction | Floor material, level changes, surface condition, cleaning activity and foreseeable contact. | Model-specific support/stability information and the site review of the intended use. |
| Complete power route | Outlet, cable exit, route, isolation access and possible contact with doors or equipment. | Connection details and an electrical plan reviewed by the responsible qualified specialist. |
| Both printed faces | Fixed side-A/side-B labels, approach direction, artwork revision and viewing conditions. | Actual templates and a completed assembly with the intended print on each side. |
| Changeover and service | Opening/removal envelope, temporary work zone, tools and authorized operator. | Model-specific instructions identifying graphic access and electrical service boundaries. |
| Release and repeat order | Stand variant, drawing revision, approved location and responsible sign-offs. | Closed sample record and an itemized kit list that retains the approved base and fixings. |
Request overall dimensions, base geometry, assembled mass and the specified base-to-upright connection. Ask which drawing revision, accessories, permitted orientation and floor conditions the documentation covers. Where an assessment or test is supplied, record the sample configuration, method, conditions and result. A photograph of a balanced-looking cabinet is not that evidence.
Have a competent site specialist consider the actual installation and foreseeable contact, including cleaning equipment or carts where relevant. A heavier or wider base is a configuration choice to review, not an automatic approval: its outline can also obstruct a route, and a substituted base changes the complete assembly. Do not add improvised weights, drill fixings or alter the support arrangement without model-specific approval and the necessary site permission.
Use a controlled assembly check to confirm that specified parts are present, the upright and base are correctly connected, the floor contact is as intended and there is no unexplained rocking, looseness or damage. Follow the supplied assembly instructions and authorized inspection method. Do not push the unit toward tipping, hang loads from it or invite people to lean on it as an informal proof test.
If the stand rocks or a connection cannot be verified, keep it out of public use and identify the cause with BrandMate and the site specialist. The remedy might involve the floor position, assembly or an approved configuration change; it should not be guessed from a single symptom. Retain the correction and repeat the affected review before releasing the location. No tip-over force, wind rating or public-area certification is claimed here.
Locate the actual cable exit on the offered assembly and trace the intended route to the power point. Measure the routed distance, including the approved route around fixtures, rather than the straight-line distance on a sales sketch. Identify plug/adapter positions, isolation access, strain or pinch points and the area used during graphic changes.
Keep trailing leads out of circulation routes. Prefer an agreed location and power arrangement that avoids a crossing. If a crossing cannot be avoided, the responsible site and electrical specialists must review the permitted protection and installation; a loose mat or a generic cable cover is not an automatic solution. The completed route still needs assessment for trips, access and movement of equipment.
Confirm the exact model’s rated input, supply and connector details with BrandMate, then have a qualified electrical specialist decide the site connection, protection and permitted cable arrangement. Do not size a circuit from LED wattage alone or improvise extensions, permanent wiring or changes inside the cabinet. Keep the approved information with the store installation pack.
Check that authorized staff can isolate power using the supplied instructions and that cleaning does not pull or trap the lead. A socket behind a fixture is useful only if access remains practical under the agreed operating procedure. A request for cordless use is a different model question: this printed light-box guide supplies no battery availability, runtime or charging specification.
Label the two sides against a fixed location reference, such as the entrance approach and the checkout approach, on the drawing and kit list. Calling one side front is insufficient if installers view the stand from opposite directions. Give each face its own artwork identifier, revision and orientation, even where the final designs are identical.
Obtain the actual print template, visible area, cut size, material/layer requirements and loading method for each face. Do not assume the reverse opens like the visible face in a catalog photograph. Confirm which components are user-accessible for routine graphics and which belong to electrical service. Follow the model’s isolation and handling instructions before access.
Review both final printed graphics unlit and illuminated under recorded site lighting from their intended approaches. Compare message visibility, reflections, edge shadows and any unexpected difference between the faces. Different artwork densities can produce different impressions; one side being readable does not approve the reverse. If a numerical lighting or color target is required, agree the measurement method and limits separately for the offered assembly.
Perform the permitted changeover in the planned work area. Confirm the operator can remove and refit the intended graphic without pulling a power lead, striking a neighboring fixture or leaving loose parts in the route. If it requires more working space than planned, revise the service arrangement. Retain approved templates and access instructions with the display, not only with the artwork supplier.
Arrange one representative assembled sample before authorizing the wider rollout. Record its model, base variant, drawing revision, included accessories and both artwork revisions. Use the intended floor and approved power route where practicable; if the sample is reviewed elsewhere, list the site conditions that remain to be confirmed. A studio demonstration does not close an untested store location.
Have the responsible people review their own decisions: the commercial buyer approves graphics and order scope; the installer confirms assembly against the instructions; the qualified electrical specialist reviews the connection; and the property or safety reviewer confirms the location under the applicable site rules. The sample record links these decisions but does not replace specialist approval or certify an entire chain of stores.
| Check | Retain with the sample | If unresolved | Close before release |
|---|---|---|---|
| Footprint and access | Plan revision, actual base outline and display/service-area photographs. | Identify the conflicting route, door or working area. | Revised position/configuration and site reviewer approval. |
| Assembly and support | Base/upright/fastener identities, instructions and relevant configuration-specific evidence. | Keep the location unavailable for public display; investigate damage, rocking or part mismatch. | Approved correction, affected recheck and responsible sign-off. |
| Power and cable | Rated-input/connection details and the complete approved cable route. | Do not energize or open the display area with an unresolved electrical or trip issue. | Qualified electrical and site review of the corrected arrangement. |
| Side A and side B | Templates, print revisions, viewing conditions and lit/unlit photographs. | Identify the affected face and whether artwork, placement or assembly needs correction. | Corrected sample or graphic and repeat of the affected viewing/access checks. |
| Store handoff | Kit list, permitted changeover/cleaning instructions and issue-reporting owner. | List missing documents or unapproved substitutions. | Complete installation pack and location-specific commissioning record. |
Use an open-issue list with an owner, agreed remedy and recheck evidence. A proposed adjustment is not a closed issue. If the base, height, connection, cable exit or loading arrangement changes after review, identify which approvals are affected and repeat them before deployment. Do not accept a substitute part merely because its finish matches.
Itemize the base, upright, permitted fixings, power components and two graphic packs against the approved assembly. Ask for packing that separates parts capable of marking the poster faces or frame and identifies the intended handling and assembly sequence. Agree the actual packing proposal with BrandMate; this is not evidence that a particular transport test has been passed.
At receiving, compare the parts and revision labels before assembly. Record missing fixings, damaged faces or cable components and obtain an approved resolution. Keep unverified substitutions out of the store kit. During commissioning, confirm the as-installed base position and power route against the approved drawing rather than treating delivery of the correct carton as installation approval.
Give store staff the permitted graphic-change and cleaning instructions, the isolation procedure and a clear way to report loosening, damage or a changed cable route. Review placement again if fixtures, queues, power points or floor conditions change. Reorders should retain the approved base and connection variant as well as the artwork template; any changed configuration needs the relevant review.
Confirm available variants, samples, spare-part scope, quantities, packing, price and timing with BrandMate for the actual project. This article does not establish a standard assembled weight, finish, stability rating, electrical certification, outdoor suitability, MOQ or delivery commitment for the pictured product.
Share the desired display size and orientation, a plan with the allotted base area, photographs of the floor/location, traffic approaches and power-point position. Add the two artwork requirements, graphic-change frequency, service constraints, deployment quantity and destination. Ask BrandMate which drawing, assembly, connection and sample documents are available for the offered model, then assign the site review before rollout approval.
No single weight settles the decision. Review the complete assembly, support geometry, actual floor, foreseeable interaction and the applicable site requirements. Request evidence for that configuration and have the responsible specialist approve its use.
The route and protection need site-specific assessment. First review whether the stand or supply can be repositioned to avoid the crossing; where it remains, obtain the responsible specialists’ approved arrangement and check the completed route.
Confirm each face on the exact assembly and use its approved template and access method. Review side A and side B separately, including the work area needed for a permitted changeover.
Explore the BrandMate LED Vertical Double-Sided Display family and use the site plan to discuss a suitable configuration and sample review.
Tell BrandMate which placement, graphic or connection decision needs review. Detailed drawings and location photographs can follow your first inquiry.