Address
Caochang Industrial Area, Liguang Rd, Lishui, Nanhai, Foshan, Guangdong, China
Phone:
0086-20-8938 9313
0086-757-8938 9313
Email:
Work Hours
Monday to Friday: 8AM - 10PM
24x7 online service

Address
Caochang Industrial Area, Liguang Rd, Lishui, Nanhai, Foshan, Guangdong, China
Phone:
0086-20-8938 9313
0086-757-8938 9313
Email:
Work Hours
Monday to Friday: 8AM - 10PM
24x7 online service
Custom LED Light Box & SEG Display Manufacturer
Approve a crystal-style acrylic light box as one identified assembly: the specified sheet and thickness, finished edges, fixing details and final illuminated graphic. Keep an agreed physical finish reference and viewing conditions with the drawing before releasing a retail order.
This guide helps shopfitters, retail display buyers and illuminated-poster distributors judge the appearance of an already selected acrylic display. The useful result is a repeatable finish and presentation approval. It does not select between light-box families or establish that a thicker sheet, a polished edge or a catalog photograph proves the complete unit suitable for a site.

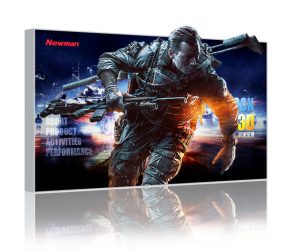
The photograph from the BrandMate LED Crystal Display family shows a framed graphic, rounded outer corners and visible corner fixings. It does not identify the sheet grade, thickness, hidden layers, lighting path or fixing capacity. Confirm those details from the actual offered model and drawing.
Start with the model, drawing revision, finished size, orientation and installation position. In this family, crystal describes an acrylic-style illuminated static-poster presentation; it is not evidence of video playback. Ask which part is acrylic, which surfaces remain visible and which parts are included in the offered assembly.
Keep each layer’s material and thickness separate from the complete sign depth. An outside depth can include spacers, a print, optical layers or a rear assembly; it is not automatically the clear sheet thickness. Request the offered drawing and its measurement points rather than inferring a sheet value from a perspective photograph.
| Boundary | Record for the offered model | Approval evidence |
|---|---|---|
| Visible sheet and edge | Material/grade, specified thickness, exposed faces, border and edge-finish description. | Identified material/finish reference and close views of the actual sample edge. |
| Complete stack | Named front/rear, print and optical layers where used, and complete assembly depth. | Section or layer drawing with the matching sample revision; do not substitute sheet thickness for total depth. |
| Graphic boundaries | Finished insert, visible opening, transparent border and artwork-safe area as applicable. | Model-specific template and final fitted graphic viewed with the unit closed. |
| Fixings and installation | Hole/slot positions, corner details, specified fittings and installation arrangement. | Drawing and responsible installer review for the actual site; an attractive fixing is not a load rating. |
| Lighting and access | Actual light source/optical arrangement, graphic-change method and separate service route. | Offered assembly details, operating instructions and a representative completed sample. |
Discuss a thickness change with the responsible technical reviewer against panel dimensions, support, fixings, handling and the intended installation. A thicker sheet is a different configuration to assess, not an automatic strength or visual-quality upgrade. Keep the accepted thickness and finish tied to the same sample and drawing revision.
Agree which edges and faces will be exposed in the installed position. Identify the intended edge profile, corner shape and any joints. A finish sample should represent the quoted material and fabrication route; a small polished offcut may show a surface effect while leaving the complete panel’s corners, holes and assembly untested.
Inspect the safely supported sample under the agreed normal room light and a documented oblique light/view that makes edge marks easier to see. Compare the same edges and corners with the retained reference, keeping orientation, background and viewing distance consistent. Capture an overall view plus identified close-ups so the location and significance of a mark remain clear.
Look for uneven finish, visible tool marks, chips, cloudy areas, residues and damage around holes or corners. Inspect visually rather than running an unprotected finger along an unknown cut edge. Keep a suspect sample out of installation and ask BrandMate to identify the appropriate correction; a photograph of a mark does not by itself prove its cause.
Distinguish material thickness, edge geometry and polish as separate requirements. A glossy edge does not demonstrate the grade, safe fixing arrangement or completed lighting result. Agree which visible conditions are acceptable, which require a corrected sample and which need technical review before signing off the order.
Place the completed sample against a representative counter, wall or display background with the intended campaign graphic. Review it from the customer’s expected positions under the store’s relevant lighting. A close photograph on a dark workbench can be useful for recording an edge but cannot establish readability beside a bright entrance or reflective fixture.
Check the unlit face and the normally operating unit separately. With the final print and agreed layers installed, assess required text, the visible border, corners, reflections and any distracting bright or dark areas. Record the actual light-box configuration, artwork revision and viewing conditions. A phone photograph is supporting evidence, not a calibrated lighting or color measurement.
If reflected light obscures a price or message, separate that observation from a print or illumination defect. Review the position, angle, store lighting, graphic and offered front finish with the responsible parties. Obtain a confirmed option and repeat the affected view rather than promising that a different sheet finish will remove every reflection.
If the edge or graphic looks uneven when lit, retain front and oblique views with the sample identity. Ask which assembly, layer, artwork or lighting condition needs correction. Repeat the complete lit review after the agreed change; an attractive unlit replacement edge does not close an illuminated-presentation issue.
Ask how this model opens and which layers a trained user may remove for a poster change. Agree the access method, required power state and support for removed parts. Graphic access is separate from opening electrical enclosures; electrical service belongs to qualified personnel following the applicable instructions and site procedures.
Review one representative graphic change with the intended staff and the final mounting arrangement when that task is part of the order. Observe where hands, tools, fixtures and removed hardware approach the visible faces. Record any interference, handling difficulty or new surface marks, then correct the approved method or configuration and repeat the affected check.
Request cleaning and protective-film instructions for the identified sheet, coating, print, adhesives and complete assembly. Confirm the permitted cleaner, cloth, method and film-removal stage rather than treating a generic acrylic recipe as approval for every finished product. Keep liquid handling away from electrical parts under the actual instructions.
Where a handling or cleaning trial is agreed, use the approved method on the designated sample, record its condition before and after, and review changes in the same light. Refer haze, residue or a new mark for assessment. Do not apply an unapproved solvent, abrasive, flame or powered polishing tool to make a delivered assembly resemble the finish reference.
Record the specific observation, affected face or edge, sample identity and conditions before agreeing a remedy. An edge chip, a surface scuff, a reflection and a displaced layer call for different investigations. Keep the original evidence and the agreed corrective scope; changing several parts without identifying them makes the revised result difficult to reproduce.
| Checkpoint | Evidence to retain | Correction and repeat check |
|---|---|---|
| Material and dimensions | Offered grade/thickness, drawing revision, finished size and named stack. | Resolve an unidentified or different layer before accepting its appearance reference. |
| Edges, corners and holes | Finish reference, overall orientation and located close-ups under agreed light. | Refer chips, uneven finish or hole/corner damage for review; inspect the corrected full sample. |
| Retail reflections | Final artwork, representative background, store light and customer viewing positions. | Review the identified position/lighting/finish issue and repeat the same reading views. |
| Illuminated presentation | Closed final stack, operating configuration and agreed front/oblique views. | Correct the responsible layer, print or lighting condition and repeat the completed lit review. |
| Access and care | Instruction reference, trained handling trial and any agreed cleaning before/after record. | Resolve interference, residue or new marks with the responsible reviewer; repeat the permitted method. |
| Protected release | Accepted sample/reference, closed corrections, packaging details, date and approver. | Review changed sheet, finish, layer, fitting or protection before assigning the old approval to a new order. |
For a proposed repair or replacement, ask what will change and which dimensional, finish, fixing or lit checks must repeat. Retain the corrected sample reference alongside the rejected one. Approval should identify the accepted configuration and closed issues, rather than relying on a promise that the next batch will look better.
Agree who approves commercial appearance, who resolves technical configuration and who checks the installation. This register is a buyer approval method, not a reported BrandMate factory test, universal defect allowance or inspection of every later unit. Any measured optical or durability requirement needs its own agreed method, conditions and real result.
Review protection for the actual visible faces, edges, corners and fittings. Ask which film or separation material is compatible, when it is removed and how the unit is supported during unpacking. Separate loose hardware from the decorative surfaces; keep the approved packing details with the identified display rather than assuming a generic wrap represents the production pack.
At receiving, reconcile the model, drawing, finish reference, quantity and visible condition under the agreed inspection plan. Photograph an affected edge or surface with its packaging and identifier before the issue is reviewed. A finished-appearance sign-off does not establish that a particular transport test has been passed.
For reorders, retain the material/grade and thickness, edge profile/finish reference, corner and fixing details, print/layer arrangement, lighting configuration and protection instructions. Flag a changed sheet, fabrication route, fitting or layer stack for review and repeat the affected checks. Do not infer matching gloss or optical performance from a repeated marketing name.
Confirm the actual sample route, supported configuration, available finish options, packing scope, price, quantity and timing with BrandMate. This guide supplies no standard thickness, coating, scratch-resistance rating, outdoor suitability, warranty or delivery commitment for the illustrated unit.
Share the intended finished size and orientation, exposed border and edge preference, retail location photographs, mounting/access constraints and the final graphic where available. Identify required material or thickness constraints, viewing positions, cleaning workflow, quantity and destination. Request the proposed drawing, finish reference and completed sample approval route.
Thickness needs review with the actual material, dimensions, supports and assembly. Agree the model-specific construction and inspect its completed finish and presentation rather than ranking offers by one sheet value.
Use them to describe the desired effect, then agree a physical reference and inspect the identified sample under recorded conditions. Pictures alone do not establish hidden layers or acceptance of every delivered edge.
Request model-specific assessment and an approved remedy first. Preserve the defect record and confirm the affected checks after correction; do not improvise a repair on a completed illuminated assembly.
Explore the BrandMate LED Crystal Display family and discuss the finish and retail presentation you need to approve.
Tell BrandMate which finish, viewing or handling decision you need to resolve. Detailed drawings and photographs can follow the first inquiry.